
Instant Pot Yogurt
Homemade Yogurt in your Instant Pot, yes please. We all know yogurt and its creamy and tangy flavor with its endlessly versatile ways of using it. Whether you enjoy it on its own, topped with fruit, mixed into smoothies, or as a base for savory dishes, yogurt is a beloved food enjoyed around our home and even more so around the world! You can find it at every grocery store around the world!
But beyond its delicious flavor, yogurt is also packed with health benefits. If you’re someone who enjoys making things from scratch, you’ll be pleased to know that yogurt is incredibly easy to make at home, especially with the help of an Instant Pot. Have you ever seen that yogurt button on you instant pot? Well, let me tell you that button is the easiest way to make your own yogurt. I promise you won’t regret using it! In this post, I want to dive into the rich history of yogurt, its health benefits, and then how you can make your own batch in just a few simple steps! I’ve written out my recipe below!
A Brief History of Yogurt
Yogurt’s history dates back thousands of years. The earliest recorded use of yogurt-like substances was in the Middle East and Central Asia. Historians suggest that people in ancient Mesopotamia and Turkey discovered the process of fermentation by accident, as bacteria in milk would naturally ferment and turn it into a thick, tangy product.
By the 1900s, yogurt became more widely recognized for its health benefits, particularly in Eastern Europe and the Mediterranean region. In the early 20th century, scientists isolated the live bacteria strains responsible for fermentation, namely Lactobacillus bulgaricus and Streptococcus thermophilus, which are still used in yogurt production today. Yogurt’s probiotic qualities started to gain more attention, and it became known not only as a delicious food but also as a healthful one.
Today, yogurt has taken on a variety of forms, from Greek yogurt to drinkable yogurt, and its popularity continues to be known worldwide. Its versatility and nutritional value have made it a staple in many cultures, and now, thanks to modern appliances like the Instant Pot, making our own yogurt at home is easier than ever. And, you get to be in control of the ingredients!
The Health Benefits of Yogurt
Yogurt is much more than just a tasty treat for our family! It’s a tasty treat packed with nutrients! Don’t tell my kids, hahah! Seriously though, it offers a variety of health benefits!
- Rich in Probiotics: The live bacteria cultures found in yogurt are beneficial for your gut health. Probiotics help balance the bacteria in your digestive system, promoting a healthy gut and supporting immune function.
- High in Protein: Yogurt, especially Greek yogurt, is a great source of protein, which helps with muscle building and repair.
- Good Source of Calcium: Yogurt is an excellent source of calcium, which is crucial for bone health. A single serving can provide a significant portion of your daily calcium needs.
- Supports Digestive Health: The probiotics in yogurt can also aid in digestion and prevent common issues like constipation or bloating.
- Improves Immune Function: Some studies suggest that the probiotics in yogurt can help strengthen your immune system, reducing the likelihood of illness.
- Versatile and Low in Calories: Whether you enjoy it sweet or savory, yogurt is a low-calorie food that can fit into many diets, making it a great option for those looking to maintain a healthy weight.

Making Yogurt in Your Instant Pot: The Easy Way
I know, making yogurt at home might seem intimidating, but with the help of an Instant Pot, I have found that it’s a simple process that anyone can master, especially if I have! The Instant Pot provides a controlled environment for fermentation, eliminating the need for special equipment like a yogurt maker or thermometer. Plus, the Instant Pot does all the heavy lifting, making it easier than ever to create your own fresh, homemade yogurt! It works beautifully for us! Here’s a LINK to all my items for this recipe below!
Ingredients
- 1 gallon milk
- 1/4 cup yogurt starter (or yogurt with live active cultures)
- Optional: sweeteners or flavorings like honey, vanilla extract, or fruit (for after the yogurt is done)
Instructions
- Prepare the Instant Pot–Be sure to clean your instant pot before use. Be sure know where your yogurt function button is located.
- Heat milk to 180-200 degrees by adding it to the instant pot and place the lid on it. Press the “yogurt” button and then press “adjust” until the screen says “BOIL”. When the Instant Pot beeps, the milk is hot and ready. Remove the lid and check the temperature with a thermometer to make sure it has reached 180-200 degreed F.
- Allow milk to cool to down to 110°F -115°F degrees F. This will take 1-2 hours if left alone, or speed up the process by placing the pot into a bowl of ice water for about 10-15 minutes. Check often with a thermometer. Spoon off any milk skin that has formed on top.
- Add Yogurt Starter. Remove a ladleful of the warm milk into a bowl and whisk the yogurt starter into it. Then pour the mixture into the pot and whisk to combine.
- Set Yogurt Timer. Place the inner pot back in the instant pot and secure the lid. Press the “Yogurt” button and adjust until it reads 8:00 to 12:00 hours (less time for looser, milder yogurt and more time for thicker, tangier yogurt. When the time is up, check the yogurt. You will know it’s ready when it has thickened and jiggles only slightly, like jello. Don’t worry after refrigerating for a few hours it will set up even more and look more like the store-bought yogurt versions you’re used to!
- Refrigerate. Remove the yogurt to a container or cover the inner instant pot bowl and refrigerate for at least 4 hours or overnight, before serving. This allows the yogurt to thicken and set up more. Stir well before serving.
- Enjoy! Your homemade yogurt is now ready to be enjoyed! You can eat it plain, or mix in your favorite fruits, honey, or granola for added flavor. If you’ve made a large batch for best results, divide it into an air-tight container and store it in the fridge for up to two weeks.
Note on Yogurt starter: You need to use a yogurt starter or store-bought plain yogurt that has active cultures in it. Check the label for the ingredients Lactobacillus bulgaricus or Streptococcus thermophilus. Do NOT use flavored yogurt because it won’t work–you can always add flavor at the end!
Tips for Success
- Use high-quality yogurt as your starter: If you decide to use yogurt with live active cultures instead of a yogurt starter, you need to make sure your starter yogurt is fresh. This will give your yogurt the best chance for success.
- Experiment with flavors: Once you’ve mastered the basic recipe, feel free to add natural flavorings, like vanilla or fruit puree, after the yogurt has finished incubating.
- Save some of your batch as starter: If you make a batch of yogurt you like, save a couple of tablespoons to use as the starter for your next batch!
Ways to Use All Your Yogurt
Ok, so know that you know why you need to be eating more yogurt and you are a pro at making it in your instant pot, what all can you actually use all this yogurt for?! Let me tell you allll my favorite ways! You’ll be using this fresh yogurt all the time, and the best part is you know the ingredients this delicious yogurt is made of!
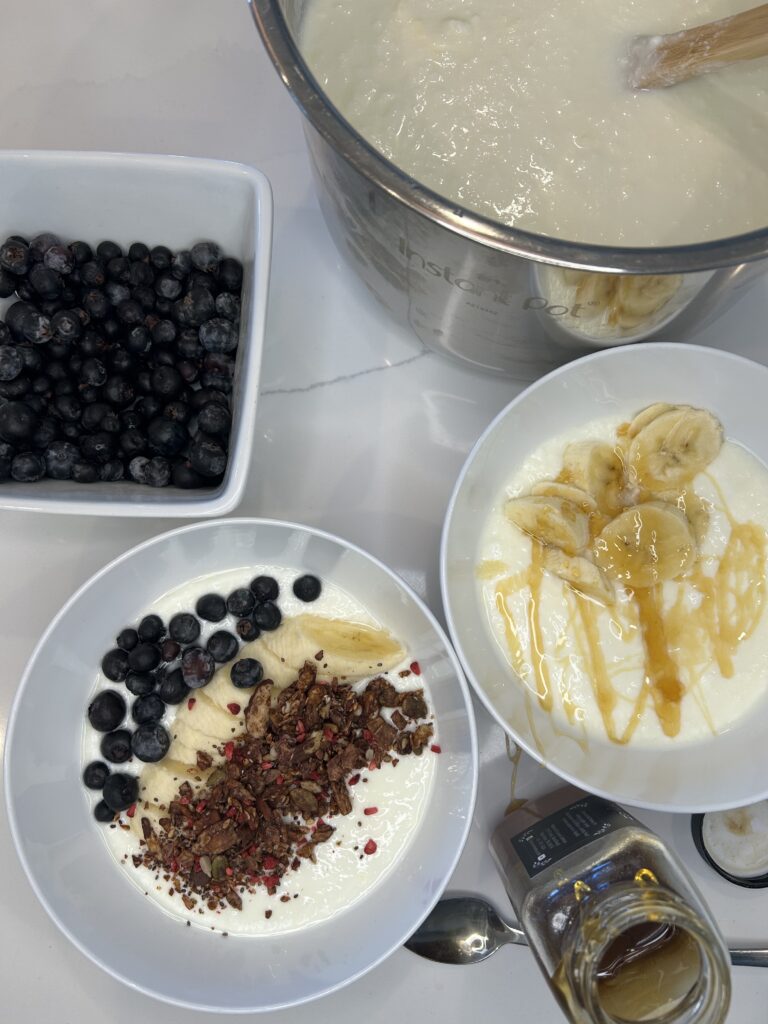
- As a Breakfast Base—Yogurt is a classic choice for breakfast, and there are so many creative ways to enjoy it. The most common way is to pair it with granola and fresh fruit for a quick, nutritious meal. But don’t stop there—get creative with your toppings! We love to add chia seeds, nuts, coconut flakes, hemp hearts for added protein, or a drizzle of honey. For extra flavor and texture, consider adding a spoonful of nut butter or a sprinkle of cinnamon on your own homemade yogurt. I love using this for our family breakfast, but it is a great option for a large family or even family gatherings! Breakfast yogurt should for sure be how you serve your first batch of homemade yogurt! You can also make a greek-style yogurt parfait by layering it with different fruits, oats, and a little bit of maple syrup. This not only looks beautiful but also keeps you full for hours.
- In Smoothies—Yogurt makes an excellent base for smoothies, adding a creamy texture and tangy flavor. You can blend a little bit of yogurt with your favorite fruits like berries, mangoes, or bananas, and add a bit of honey for sweetness. If you’re looking for an extra protein boost, creamy Greek yogurt is perfect, while regular yogurt provides a more delicate texture. Add spinach, flax seeds, or a spoon of protein powder for a healthy, filling smoothie. Whey proteins mix in well!
- In Savory Dips—Yogurt isn’t just for sweet dishes; it’s also a great ingredient for savory dips. Take tzatziki, the famous Greek cucumber-yogurt dip, for example. It’s simple to make by mixing plain yogurt with grated cucumber, garlic, olive oil, and a little lemon juice. This dip is perfect for pairing with pita bread, vegetables, or grilled meats. You can use your easy homemade yogurt for this dip! You can also experiment with other savory yogurt dips like spicy yogurt salsa, where yogurt is combined with fresh tomatoes, cilantro, and jalapeños, or a yogurt and herb dip made with dill, parsley, and garlic. Really, the possibilities are endless. You don’t have to necessarily stick with the traditional method of just eating plain yogurt!
- As a Substitute for Sour Cream or Mayonnaise—In recipes that typically call for sour cream or mayonnaise, you can use yogurt as a healthier substitute. It’s lower in fat and calories but still provides a rich, creamy texture. Try using it on tacos, burgers, or baked potatoes instead of sour cream. You can even use yogurt in salad dressings, replacing mayonnaise for a lighter, tangier version.
- In Baking—Yogurt is a fantastic ingredient to use in baking, especially in cakes, muffins, and pancakes. It helps keep baked goods moist while adding a bit of tang to balance the sweetness. You can replace some of the fat in recipes with yogurt to make your treats healthier. For example, you can use yogurt in a banana bread recipe to replace some of the butter, or add it to pancakes for a fluffier texture. One popular choice is to add Greek yogurt to cakes or cookies for extra protein. Did you know it can also be used to make a quick and easy frosting by mixing it with a bit of powdered sugar and vanilla extract?!
- In Marinades—Yogurt works wonderfully as a base for marinades, especially when you’re cooking chicken, lamb, or even vegetables. The acidity of yogurt helps tenderize the meat while infusing it with flavor. To create a marinade, simply mix yogurt with garlic, lemon juice, olive oil, and your favorite spices. Indian-style marinades like those used for chicken tikka masala often include yogurt as a key ingredient, adding richness and complexity to the dish.
- As a Frozen Treat—If you’re craving something sweet, try making your own frozen yogurt. This is an easy and healthier alternative to ice cream. Simply mix yogurt with a bit of honey or fruit puree and freeze it. You can also make yogurt popsicles by blending yogurt with fruit and freezing it in molds. It’s a great way to enjoy a refreshing treat without all the added sugar.
- In Soups and Stews—Yogurt can be used to add creaminess to soups and stews without the need for heavy cream. It’s commonly found in Middle Eastern and Mediterranean dishes. For example, in dishes like lentil soup or chickpea stew, adding a dollop of yogurt right before serving creates a smooth and velvety texture. You can also swirl it into a spicy tomato soup for a rich, tangy contrast.
- As a Healthy Snack—Yogurt is a perfect stand-alone snack, especially when you’re looking for something light yet satisfying. A small bowl of plain yogurt with a handful of fresh fruit, seeds, or a sprinkle of cinnamon makes for a quick and nutritious snack that will keep hunger at bay.
Yogurt’s versatility makes it a fantastic addition to almost any meal or snack. Whether you’re making a savory dish, a sweet treat, or using it in a skincare routine, yogurt brings something special to the table. Next time you open your fridge, think beyond the bowl and get creative with how you use this humble dairy product in your cooking and daily routine. The possibilities are endless! I mean your yogurt making is going to take your meals and snacks to the next level! Click HERE are my favorite items to use for Instant Pot Yogurt including the starter I use and thermometer I love!
Ok, so you see, making yogurt at home in your Instant Pot is a quick, and easy to enjoy this nutritious, probiotic-rich food without extra cost. With just a few ingredients and a little patience, you can have fresh, creamy yogurt whenever you want. Plus, the health benefits of yogurt—from supporting digestive health to providing a rich source of protein and calcium—make it a valuable addition to any diet. So why not give it a try and enjoy the this homemade instant pot yogurt recipe? Your taste buds (and your gut) will thank you!

Instant Pot Yogurt
Ingredients
Method
- Prepare the Instant Pot–Be sure to clean your instant pot before use. Be sure know where your yogurt function button is located.
- Heat milk to 180-200 degrees by adding it to the instant pot and place the lid on it. Press the “yogurt” button and then press “adjust” until the screen says “BOIL”. When the Instant Pot beeps, the milk is hot and ready. Remove the lid and check the temperature with a thermometer to make sure it has reached 180-200 degreed F.
- Allow milk to cool to down to 110°F -115°F degrees F. This will take 1-2 hours if left alone, or speed up the process by placing the pot into a bowl of ice water for about 10-15 minutes. Check often with a thermometer. Spoon off any milk skin that has formed on top.
- Add Yogurt Starter. Remove a ladleful of the warm milk into a bowl and whisk the yogurt starter into it. Then pour the mixture into the pot and whisk to combine.
- Set Yogurt Timer. Place the inner pot back in the instant pot and secure the lid. Press the “Yogurt” button and adjust until it reads 8:00 to 12:00 hours (less time for looser, milder yogurt and more time for thicker, tangier yogurt. When the time is up, check the yogurt. You will know it’s ready when it has thickened and jiggles only slightly, like jello. Don't worry after refrigerating for a few hours it will set up even more and look more like the store-bought yogurt versions you're used to!
- Refrigerate. Remove the yogurt to a container or cover the inner instant pot bowl and refrigerate for at least 4 hours or overnight, before serving. This allows the yogurt to thicken and set up more. Stir well before serving.
- Enjoy! Your homemade yogurt is now ready to be enjoyed! You can eat it plain, or mix in your favorite fruits, honey, or granola for added flavor. If you’ve made a large batch for best results, divide it into an air-tight container and store it in the fridge for up to two weeks.